I’ve seen hundreds of DIY bridal makeup & hair looks, but I’ve never been able to find a vegan cruelty-free tutorial. So, this motivated me to create one myself.
The Makeup Tutorial:
- Products used:
- All over the face: Reviva Makeup Primer and Josie Maran Argan Foundation (color: light/medium), and Josie Maran Pressed Powder in Warm Sienna.
- Eyes: Mineral Fusion Eye Primer, Pacifica Power of Love Essential Eyeshadow Palette (Shades- cream, taupe and plum), Josie Maran Coconut Watercolor Eyeshadow in Playa Del Pink, Earth Lab Cosmetics Vegan Mineral Eye Pencil in Black, Mineral Fusion Mascara, Honest Beauty Eyebrow Pencil in Dark Blonde, Winks Faux Eyelashes by Georgie, and Clear Lash Adhesive by Georgie.
- Cheeks & Lips: 100% Pure Blush Pink Champagne Luminizer, 100% Pure All Over Glow: Lightly Sun Kissed, Zuzu Lip Liner in the color Innocence, and Jane Iredale Lip & Cheek Stain in Forever Peach.
- Apply primer all over your face and eye primer on your eyelids.
- Start with your eye makeup because eyeshadow residue may fall around your eye area. So, this makes it easier to clean up any residue.
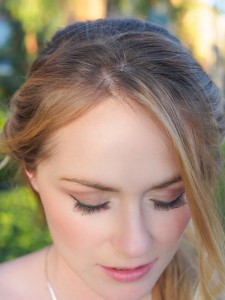
- Apply a small dot of foundation all over your eyelids. This will help your eyeshadow go on smoothly and it will help enhance the shadow color. Apply the light cream eyeshadow all over your lid and do not go higher than your crease. Then lightly pat the taupe shadow to the middle of your lid. Next, apply the plum shade in the corner of your eye. Blend everything out with a blending brush. For an extra glow add the Josie Maran Watercolor Eyeshadow all over your eyelid.
- Tightline your upper eyelid with an eye liner by getting as close as to your waterline as possible. Then apply the eyeliner along your top eyelashes. Keep the eyeliner as thin as possible at the inner eye and make it thicker as you go towards the outer eye. You can put a little eyeliner to bottom eyelid, but only to the outer quarter. Do not line your entire bottom lid as this will make your eyes appear smaller.
- Apply your false lashes to your upper lash line. After your lashes have set go back over the lash line and cover any glue with your eye liner. Curl your lashes and apply mascara.
- Shade in your eyebrows with your eyebrow pencil and run a spooly over your brows after your done.
- Now you can apply your foundation all over your face, set it with powder, and finish it off by patting everything down with a beauty blender.
- Next, apply the blush to the apples of your cheeks and blend it out. Again, set your blush by patting it down with your beauty blender.
- Using the 100% Pure Bronzer, pump a dollop on your hand and use your fingertip to apply it. Start at your temples and make a backwards three along each side of your face. So the bronzer should go on your temples, cheekbones, and along your jawline. Be sure to blend it all out with your damp beauty blender.
- Now you can finish the look off by lining your lips. To help your lipstick color last you should color in the majority of your lips with your liner and then finish it off with the Jane Iredale Peach Lip Stain.
Hair Tutorial:
- Tools & Products Used: Teasing Brush, Alligator Clips, 1in Curling Iron, Giovanni Dry Shampoo, DermOrganic 8 Way Thermal Spray, Andalou Naturals Hair Spray, Bobby Pins, Clear Elastic Hair Ties, and this is optional- I added a pretty haircomb.
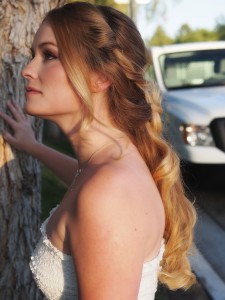
- This look works best on freshly cleaned hair. For extra volume apply dry shampoo to the roots of your hair. Now apply your DermOrganic Thermal Spray as this will act as a heat protectant for when you curl your hair.
- Next, grab a few pieces in the front that you would like to leave out to frame your face and clip each side with an alligator clip.
- Optional step: For extra volume tease the hair at the crown of your head.
- Leave about two inches out on each side of your head and gather the crown area into a half up half down ponytail and secure with bobby pins.
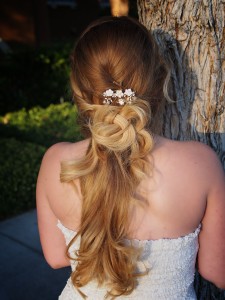
- Grab a one inch section on the side of your hair and twist it. Secure the twist with a bobby pin at your ponytail. Do the same to the other side and repeat with the last two remaining side sections.
- Take the ponytail in the middle and create a simple braid and secure it with a clear elastic. For extra volume lightly loosen your braid by gently pulling on each section/piece of the braid.
- Tie your braid into a knot and secure with bobby pins.
- On medium heat curl any hair that is loose. Take our your alligator clips and curl the hair framing your face. Lightly hairspray your curls.
- Optional: I decorated this look with a haircomb, but you can also try styling your look by pinning fresh flowers to the top of your braided bun or even pin the flowers inside your braided bun.
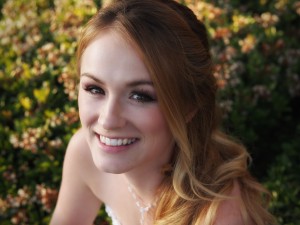
- Voila, your hair & makeup is complete!
Are you planning an ecofriendly event? Be sure to contact Angelica of Eco & The Princess.
Credits:
Written by Jenny K.
Makeup and Hair by Jenny K.
Photos by Jenny K and captured with the Olympus OMD camera.
Model: Sarah Duta